Showing posts with label revamp. Show all posts

Wednesday, September 24, 2014

Clipboard Wall Art and Framed Thread Rack

I've arranged and rearranged the furniture in my office/studio/sewing room space about 15 times in the last year and a half.  I don't know anything about feng shui, but something just wasn't working for me.  I finally think I have it just the way I want it, so of course I needed to dress up the walls.

My first wall art project is a clipboard art collage.


These 6 inexpensive clipboards are from Amazon. I designed some printables with my favorite quotes and subway signs from my favorite cities to display on the clipboards.  I love the way they look, and what's best is that I can update it is often as I want with new printables, photos, etc.

My next wall art project was super simple. I framed my thread rack!


My mother-in-law was giving away an old framed print of a bouquet of flowers.  The glass had broken ages ago, and the print was warped and scratched, but the frame still looked great!


I snatched it up right away, ditched the old print and painted it Annie Sloan Provence. It now hangs around my bare thread rack.

Here's a peek into my sewing corner. The folding table on the left will be replaced at some point, and the wooden chair will be painted...eventually. But for now, this space suits me!


Photobucket

Tuesday, September 23, 2014

Lamp Revamp and DIY Throw Pillows

I am addicted to Target!  I can go into a Target for a loaf of bread, and will come out with a cart full of goodies and a receipt for $250.  I truly believe that time stands still inside of Target.  There have been times when I could swear I've only been shopping for 30 minutes and three hours have passed.

Last week, on a grocery run, I did my usual quick walk down the end caps of the home goods department. I love finding items that I've been eyeing or cool linens on clearance that I can repurpose.

I flipped when I found a gorgeous medallion print lampshade on clearance for $9.  Then, a few aisles down, I found a set of cloth napkins for $7, and a body pillow cover for $5.  I knew exactly what I could do with these!


I've had a blah-beige lamp sitting on my end table for months (a year?)  I got it for $5 at a local thrift store and had intended to paint it--someday.  Well, after finding this lampshade, I knew I would  be painting it Provence by Annie Sloan Chalk Paints. (DIY cost: $14, plus paint)  LOVE!


I sewed the napkins together to make two beautiful throw pillow covers, and I used the body pillow cover to make 2 square and one rectangle throw pillow covers.  (DIY Cost: $12 for 5 pillows, plus inserts.)

I can't wait for my next Target trip!

Photobucket

Monday, September 30, 2013

Thrift Store Corkboards Two Ways

My daughter needed a corkboard to hang above her new desk and I was lucky to come across two giant corkboards at my local thrift store last week.  They were both on sale, marked down to just $1.25! They needed a little TLC, for sure, so this is what I came up with:

I was lucky enough to find a piece of fabric in my stash that was just the right size to upholster the corkboard.  Using a staple gun, I stretched and attached the fabric to the back of the frame stapling the whole way around. 


 That's it!  It probably took me less than 15 minutes total to upholster it and hang it on the wall.


I had some left over chalkboard paint from a project I did at least 2 years ago.  I don't think I ever shared it with you, but you can see it here.  I took the corkboard outside and spray painted it with the chalkboard paint, letting it dry between coats.  Easy peasy!!  I added a typography Julia Child quote with chalk and hung it near my kitchen table:


I think it looks fab...except hubby keeps reading it as "People Who Eat People"...maybe I'm too subconsciously addicted to The Walking Dead!

Can you believe these two corkboards once looked like this?


(Disclaimer:  I fully realize that these are awful photos!  This is what happens when you are in a rush to document a project!)


Photobucket

Sunday, September 22, 2013

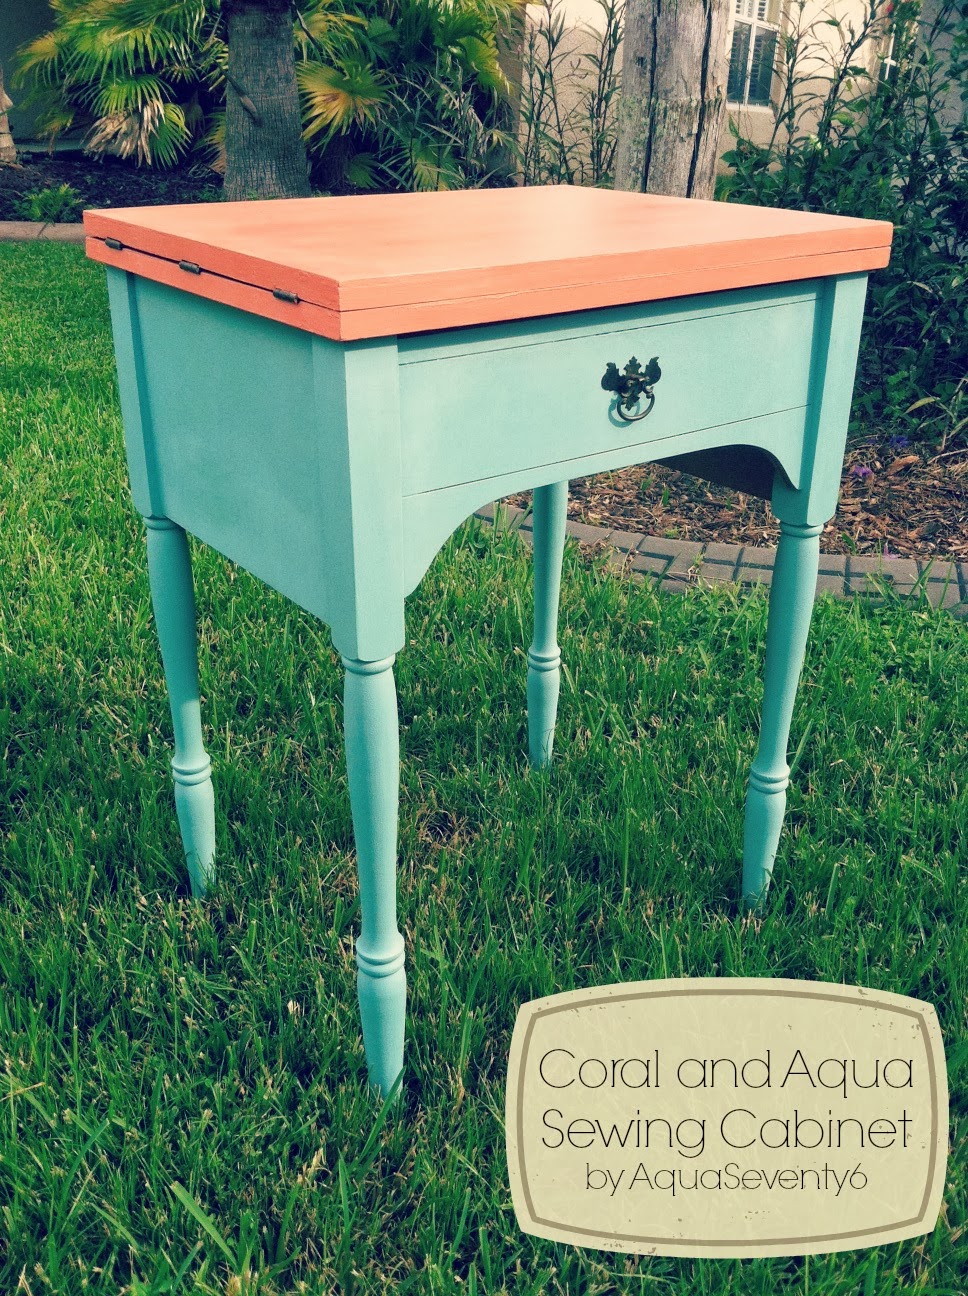
Easy {DIY} Vintage Sewing Cabinet Makeover

The months of August and September have been crazy busy for me!  I thought for sure that when the kids were back to school that I would have SO MUCH TIME to get all of my housework, work-work, volunteer-work, and DIY fun-work done that I would be literally searching for something to do...WRONG!

Housework has been on hold, work-work has picked up, and volunteer-work comes in almost daily. This means that DIY fun-work gets squeezed in at all hours of the night while everyone is in bed and I am desperately trying to catch up with my "Mom-only" guilty pleasure shows (Mistresses, Devious Maids, Real Housewives of Miami...)

Here's my latest midnight project:

My Easy DIY Vintage Sewing Cabinet Makeover
My daughter has been asking for her own desk since school started, but she doesn't have a lot of space in her bedroom. As I was searching for a small table I could transform into a desk, I came across this vintage sewing cabinet at my local thrift.


These are a fairly common item at garage sales and thrift shops.  In fact, there were two different ones for sale on the day I found her.  Yep, it's a her....

She was marked at $35 because she came with a working sewing machine installed, still a pretty good deal, but I really just wanted the cabinet.  The tag showed that it was the 7th day since she had been put out for sale, so I asked the manager and he brought the price down to $20, machine and all.

This girl weighed a good 40 lbs, so even if I wanted to just tuck away the machine, I knew it would just be way too cumbersome to keep installed. I unscrewed the bolts and set the massively heavy machine aside for my upcoming charity yard sale.

As part of my search for a desk, I had come across a new (to me, at least) line of chalk paints at a local home goods consignment shop and I decided to try some out.

I fell in LOVE with this coral color called Gypsy by Vintage Market & Design Furniture Paint.  I coordinated it with some Annie Sloan Provence, used the Annie Sloan clear wax and left the hardware with its existing patina.  Not much work, but boy, what an update!

My daughter LOVES it, and it fits right into the little corner of her bedroom.  I'm still debating whether to hang a basket in the hole where the sewing machine was or to cover the hole completely with a thin piece of board, but for now she can do her homework in the comfort of her own room.


Adorable, right??  Now on to search for the perfect chair!

Photobucket


Click here to see the amazing sites where this and my other projects are linked!

 Other\ fun parties:
Saavy Southern Style

Tuesday, August 27, 2013

Back to School...Back to Work!

It's here...back to school time.  I'd been dreading this since June, but I knew it was inevitable.  In the blink of an eye we were back to 6 a.m. wake-up calls, packing lunches, car lines and homework.

This year, my son (now 13 and in 8th grade) decided to take a "break" from the school band.  Break=quit, I know.  I don't try to block the sun with one finger, like my mom would say. In his defense, he never aspired to be a concert trumpeter (he wants to be a robotics engineer), and there were some technology classes he wanted to take before leaving middle school.  As a plus, he no longer has to carry a 20 lb trumpet case around the school, which I believe is at least partly to blame for his recent referral to a radiologist for a scoliosis survey.


My daughter (now 10 and in 5th grade) has been excited about going back to school and seeing her friends again. More excited, I think, about the possibility of an entirely uninterrupted school year.  In 3rd grade she broke her leg during spring break.  Because she was in a full cast and would need assistance using the restroom, the school recommended home bound instruction. She was taught at home for 5 weeks.   Last year, as you may recall, we moved back to Florida three months into the school year.

That move, in fact, is what pulled the emergency breaks here at AquaSeventy6...good segue, right?  (And, yes, it's "segue", not "segway" like the scooter.  Trust me, I Googled it.)

AquaSeventy6, the blog and the shop have been suffering since my move.  I pop in every few weeks to apologize and promise to do better, only to get wrapped up in life and end up apologizing all over again. But, my friends, this time it's different, and that's a promise. I finally have all of my sewing supplies under one roof again.  The kids are back to school and I am no longer commuting across town.  That said, there are going to be some changes going on as well.

I am first and foremost a writer.  I'm neither Fitzgerald nor Hemingway, but I do think in monologue, and have since I was a kid. I plan on adding more anecdotal and family related posts in the future, which may or may not include anything crafty. (Anyone else get all Grandma's-Crocheted-Santa-Potholder when you hear the word "crafty"?  Trust me, I avoid it as much as possible.  I prefer "handmade" or "DIY" myself.)

As far as my shop, I do plan to reopen it at some point.  I don't like to list special order items, I prefer only to list what I have on hand so my clients can get their goodies ASAP.  This means I have to get on the ball and make inventory.  I love inventory because I have so many bits and pieces of amazing, often discontinued fabrics that I can use to make some truly unique pieces. But inventory takes time, so the shop reopening time frame is currently TBA.

I also plan to get back to featuring my furniture revamps.  These may be items in my own home, or possibly something for a friend or client.  I've been painting and updating vintage furniture for several years now.  Just this summer I've redone 4 or 5 pieces of my own furniture...I just haven't gotten around to photographing any of it! :(  Revamping furniture was my first DIY passion prior to sewing, and sadly I let it fall to the wayside.


Finally, I will continue to toss in some fashion and style related posts here and there. Wow!  I guess I actually AM excited that the kids are back to school, because I truly have missed this!

I will be back soon with a new post, but for now I am hitting the sack!!  It's almost 1 a.m., y'all! 


Photobucket 
 
PS....what do you think of my new blog design?  

Thursday, September 22, 2011

Flash Back in Blue

Speaking of drop leaf tables...my very first furniture revamp was a $6 score from Goodwill. I was with Yvette (ahh...the good ole days of living in the same city and rock bottom prices at Goodwill) and she forced me to buy the table. She pulled the tag and said "if you paint this and you hate it I will give you your $6 back...but I bet you are going to love it."

Photobucket

This is what it looked like before me and 3 cans of spray paint got ahold of it.
This is what it looked like after.

Photobucket

It's nice to see how far I have come and the tricks techniques I have learned. But Yvette was right - I do love this piece!
It is symbolic and fun and memorable.

It is currently serving as my sewing table until I find the one of my dreams.
I also picked up a little mail sorter that day and optimized my spray paint purchase.

Photobucket

Having these projects around my home give it is a sense of soul and flavor.
I wouldn't have it any other way!

Photobucket

Wednesday, September 14, 2011

Magazine Rack Redo

I have a bit of an obsession with magazine racks, especially the old-school wood ones. While I was in Florida a couple of weeks ago, I stumbled across the perfect rack for my guest bathroom.  Yes.  I said BATHROOM.  Every bathroom in my home (other than the kids' bath) has its own fully-stocked magazine rack.  I don't know about you guys, but the only privacy I seem to have these days is when I lock myself up in the john.  Why not use the time to catch up on my reading? :)

This super sturdy rack caught my eye at a Salvation Army in Wesley Chapel, FL.

Lucky for me it was blue tag day, so I snatched this up for $3.50
Here she is after two coats of Annie Sloan Provence.

I decided not to distress this piece.  I loved it just the way it was.

I used only Clear Wax.
Here it sits, in its new home, the Powder Room, fully stocked with local magazines. Perfect for when our out-of-town guests come to visit.


Click here and here to see where this, and our other projects are linked.


Photobucket

Tuesday, September 6, 2011

Magnet Board Revamp

One of the reasons I love fabric is because it is so versatile. You can create or embellish an endless amount of items with glorious fabric. Even a boring old magnet board.

Snapbucket

This is what it looked like before.

Snapbucket

This project is so simple, you are most likely going to roll your eyes.
All I did was cut my fabric one inch larger than my board, fold around to the back of my board and secure it with hot glue. God bless the hot glue gun!

Snapbucket

It was so fast and easy, I even made one for the kids!

Snapbucket

There you have it; plain ole magnetic boards turned colorful and unique!


Photobucket

Tuesday, August 16, 2011

Men's Shirts Become Boy's Pillows

Snapbucket


I was really drawn to the pattern and colors of these men's shirts when I saw them at Goodwill. For $4 each, I figured I would make the investment and see what I could come up with.

Snapbucket

First, I cut a square to fit my pillow form. I wanted to keep the pocket and buttons in tact for the pillow front. I used my machine to embroider my older son's monogram onto the pocket of the dark blue pillow cover.

Snapbucket

For my younger son, I cut the initial of his first name out of felt, adhered it with fusible tape and tacked it down with some orange embroidery floss for contrast and color.
Snapbucket


These were so easy! They only took about 20 minutes each. The boys just love their special pillows.
A fun upcycled project always makes me smile!


Photobucket

Monday, August 15, 2011

Oldie But A Goodie: Red Dresser


Disclaimer:  The following was one of my first furniture makeovers. Before I became obsessed with Annie Sloan Chalk Paints, I would enlist my husband to help me out with all the un-fun stuff that comes with refurbishing a piece of furniture (mainly sanding, although he often took over the painting as well). This is one of the projects we worked on together.


About this time last year I pulled up to a thrift store that had recently opened in my old neighborhood and  I saw this beauty sitting by donation door.  I asked right away how much they wanted, and since it had just been dropped off, the manager let me have it for $10!


It was kind of gross, and the trim had been painted a bright blue, but it had a gorgeous shape!

I love finding surprises (of the non-organic kind) when I purchase a dresser, and this one was great.  The underside of the drawers were lined with a newspaper from 1996 (which is probably when they first revamped this dresser with the blue paint!)


After sanding down the edges we could see the original gold paint peek through.


 Two coats of a Sherwin Williams red paint (I don't have to color handy--sorry!!) and...


I kept the original handles after spraying them with a dark brown Rustoleum paint.


I wanted a clean look, so no distressing here.


So can I get a 'what what'??

Scroll down to see where this and our other projects are linked.

Photobucket