Showing posts with label sewing. Show all posts

Wednesday, September 24, 2014

Clipboard Wall Art and Framed Thread Rack

I've arranged and rearranged the furniture in my office/studio/sewing room space about 15 times in the last year and a half.  I don't know anything about feng shui, but something just wasn't working for me.  I finally think I have it just the way I want it, so of course I needed to dress up the walls.

My first wall art project is a clipboard art collage.


These 6 inexpensive clipboards are from Amazon. I designed some printables with my favorite quotes and subway signs from my favorite cities to display on the clipboards.  I love the way they look, and what's best is that I can update it is often as I want with new printables, photos, etc.

My next wall art project was super simple. I framed my thread rack!


My mother-in-law was giving away an old framed print of a bouquet of flowers.  The glass had broken ages ago, and the print was warped and scratched, but the frame still looked great!


I snatched it up right away, ditched the old print and painted it Annie Sloan Provence. It now hangs around my bare thread rack.

Here's a peek into my sewing corner. The folding table on the left will be replaced at some point, and the wooden chair will be painted...eventually. But for now, this space suits me!


Photobucket

Monday, September 22, 2014

DIY Decor Week

Things started to settle down a tiny bit last week, so I had a little time to tackle my long DIY to do list!  Some were half-finished projects, others were ideas on my DIY wish list and a couple were inspired by necessity or a really good sale.  Here's a peak at what I will be sharing with you this week!


Photobucket

Thursday, August 7, 2014

What I've Been Working On (#WIBWO) Summer 2014 Edition

Hello!  It's been awhile!  I'm sorry that I haven't update this blog in so long!  I have been having a wonderful summer, and I just haven't made the time to sit behind the computer.

If you follow me on Instagram or Facebook, you will have seen some of the fun times we've had, as well as what I've been working on.  Today I want to share with my blog readers what's been going on in my studio...

The following post is going to be picture heavy, but I just have so much to share!


I got really busy this summer working on my signature Wet Bags ($14).  I picked up some new fabrics and was so excited to ship these bags to clients near and far!


These Anchor Wet Bags SOLD OUT in just a couple of days!
Fabric Keyrings ($7), one of the first handmade accessories I debuted back in 2011, are popular year-round, but more so during the school year when parents purchase this cute and practical gift for their child's teachers.


During back-to-school time, I feature my Fabric Lanyards ($10).  These are great for teachers, students, and anyone who needs to carry a badge at work.  These are also great to hold your keys!  I wear mine tucked into my top when I go for a walk or jog.


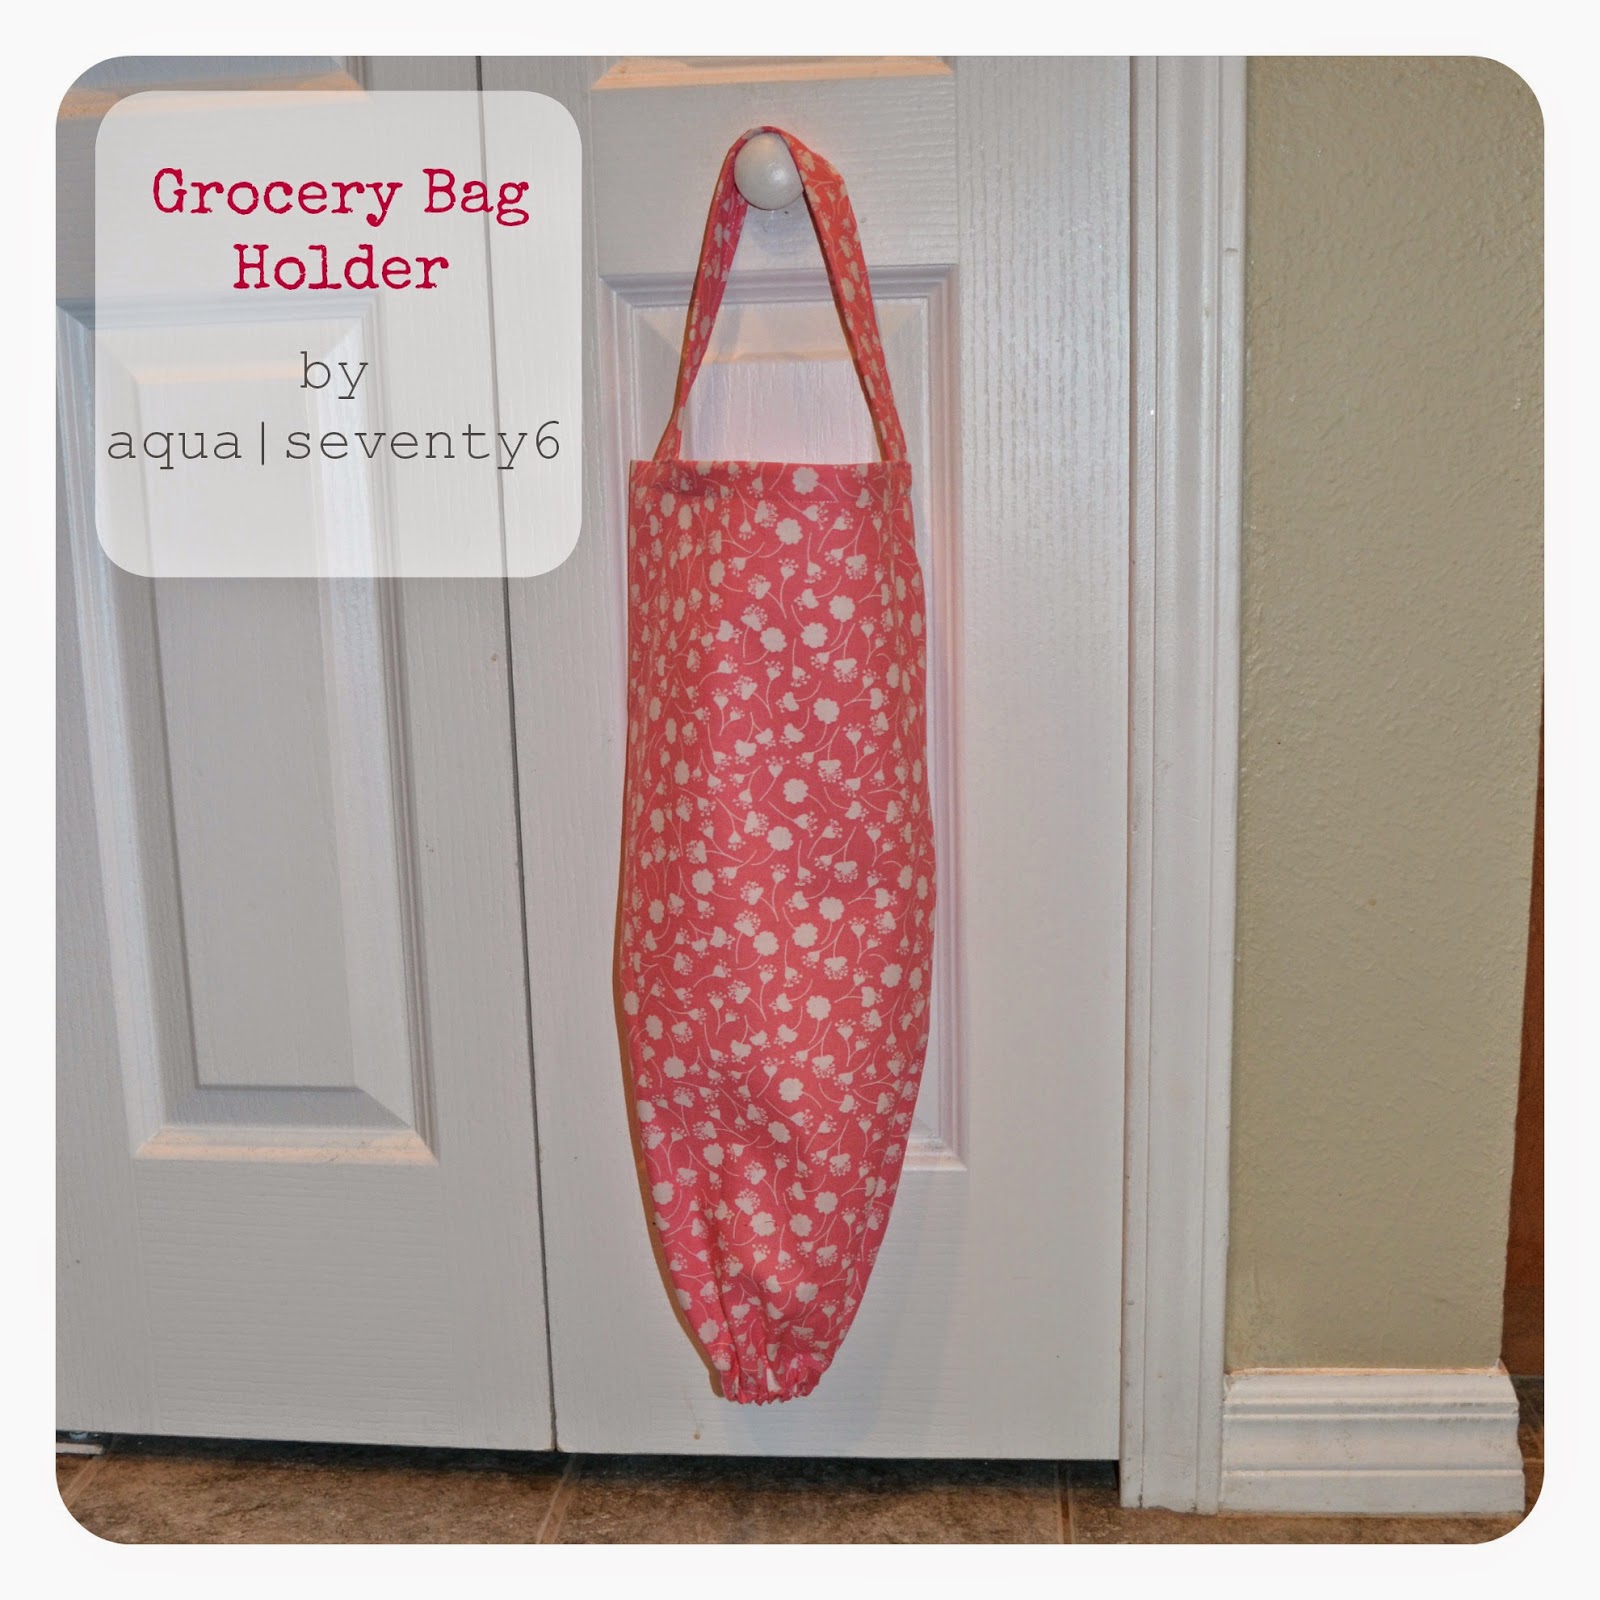
I had a custom request a couple of weeks ago from one of my most dedicated clients for a Grocery Bag Holder ($10). This is new to AquaSeventy6 and I am happy to debut it on today's blog:


Finally, this summer I debuted a Layette Combo. This comes with 2 applique onesies, 2 applique burp cloths and a matching vinyl-lined "Everything Bag" made to order for $40 (15% savings) or upgrade the Everything Bag to a full-sized Wet Bag for just $2 more (that's a 20% savings.) These make unique and thoughtful baby shower gifts!

This is an example of the Little Man combo.


If you want to place an order for anything you see on my blog, email me at aquaseventy6@gmail.com.  Everything is made-to-order and ships first class with tracking. Thanks for reading! xoxo

Photobucket

Monday, October 14, 2013

15 Minute Project: Tablecloth Curtains

I needed some curtains for my dining room (in progress) but I couldn't find any that I loved without giving up my first born child in return.  Then I came across two of these tablecloths:


15 minutes later I had this:


I love quick and easy projects almost as much as I love repurposing and upcycling.  This is my favorite curtain tutorial so far, especially because it is only has 4 steps.

  1. Find a great deal on 2 identical oblong fabric tablecloths (Target's Threshold brand comes in 84" length...the same as a basic curtain panel! Many tablecloth brands range up to 120" in length for the same price!)
  2. Fold over the end of each of the tablecloths and pin to create a pocket on each for the rod.  The amount your fold depends on the size of the curtain rod.  Keep in mind that the more you fold over, the shorter the curtains will be. Make sure you fold them identically so that the panels hang evenly!
  3. Stitch along the bottom of each fold.
  4. Hang your new curtain panels!
What I love most is that tablecloths are already hemmed along all four sides, so you only have to sew one straight line across each!


Identical curtain panels at Target cost $24.99 each!  These tablecloths were $18.99 each (regular price). I saved 20% using my Cartwheel app, AND I had a Target coupon for $5 off a home purchase, so I ended up spending around $25 for both.  Another plus is that tablecloths are anywhere from 6" - 20" wider than curtain panels, so I only needed two for this large window, where I would've normally needed 4 traditional panels.


If you keep your eyes peeled, you will catch a great deal on some tablecloths.  I've seen some as low as $6 recently! 

A variation of this tutorial for more narrow windows:

  • Use only one tablecloth.
  • Cut the tablecloth in half lengthwise.
  • Hem both newly cut sides
  • Follow steps 2-7 above.
  • Save EVEN MORE MONEY!

Photobucket

Sunday, September 22, 2013

Easy {DIY} Vintage Sewing Cabinet Makeover

The months of August and September have been crazy busy for me!  I thought for sure that when the kids were back to school that I would have SO MUCH TIME to get all of my housework, work-work, volunteer-work, and DIY fun-work done that I would be literally searching for something to do...WRONG!

Housework has been on hold, work-work has picked up, and volunteer-work comes in almost daily. This means that DIY fun-work gets squeezed in at all hours of the night while everyone is in bed and I am desperately trying to catch up with my "Mom-only" guilty pleasure shows (Mistresses, Devious Maids, Real Housewives of Miami...)

Here's my latest midnight project:

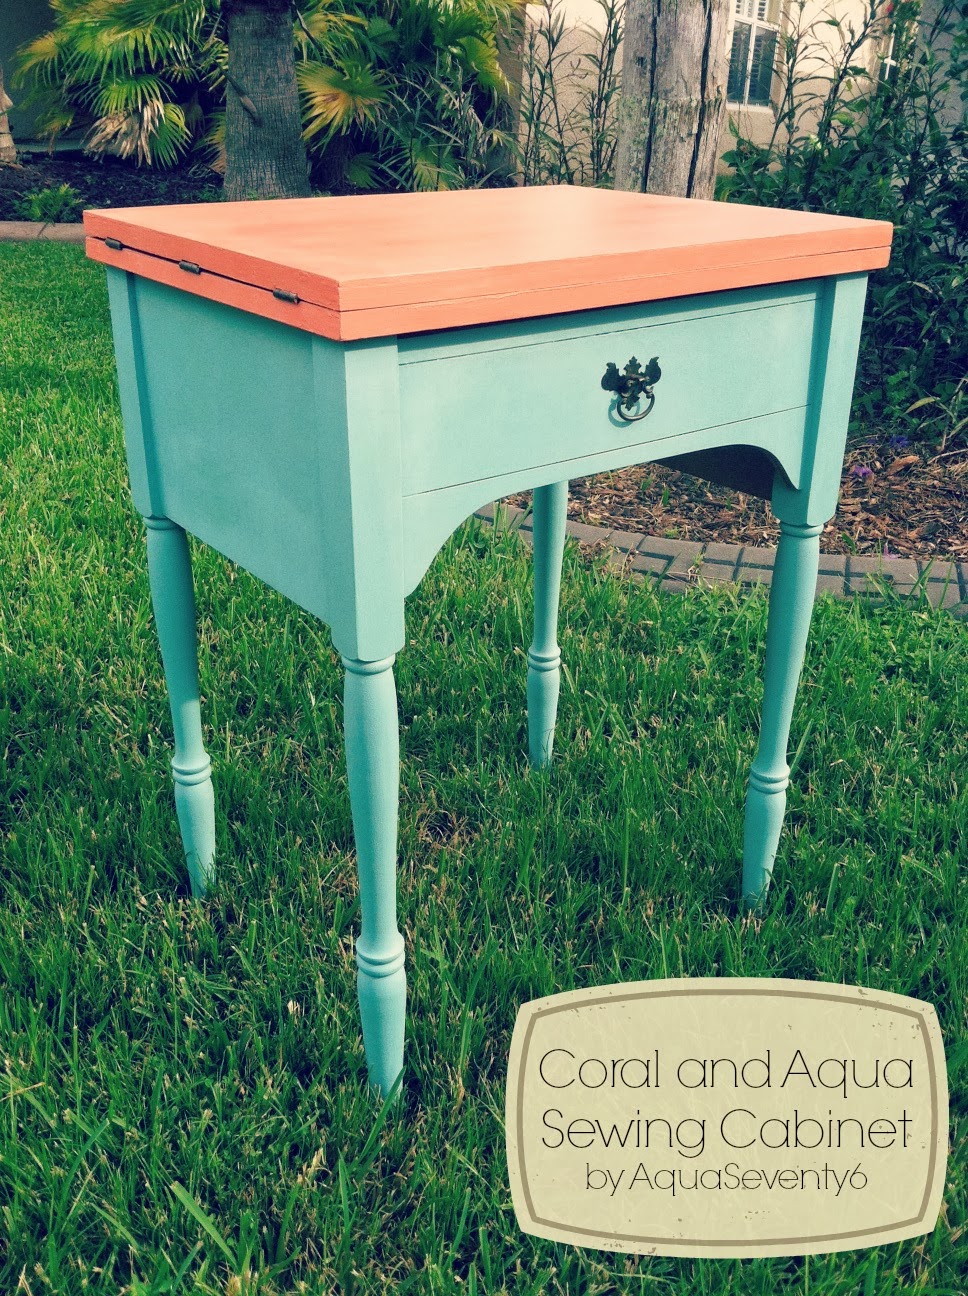
My Easy DIY Vintage Sewing Cabinet Makeover
My daughter has been asking for her own desk since school started, but she doesn't have a lot of space in her bedroom. As I was searching for a small table I could transform into a desk, I came across this vintage sewing cabinet at my local thrift.


These are a fairly common item at garage sales and thrift shops.  In fact, there were two different ones for sale on the day I found her.  Yep, it's a her....

She was marked at $35 because she came with a working sewing machine installed, still a pretty good deal, but I really just wanted the cabinet.  The tag showed that it was the 7th day since she had been put out for sale, so I asked the manager and he brought the price down to $20, machine and all.

This girl weighed a good 40 lbs, so even if I wanted to just tuck away the machine, I knew it would just be way too cumbersome to keep installed. I unscrewed the bolts and set the massively heavy machine aside for my upcoming charity yard sale.

As part of my search for a desk, I had come across a new (to me, at least) line of chalk paints at a local home goods consignment shop and I decided to try some out.

I fell in LOVE with this coral color called Gypsy by Vintage Market & Design Furniture Paint.  I coordinated it with some Annie Sloan Provence, used the Annie Sloan clear wax and left the hardware with its existing patina.  Not much work, but boy, what an update!

My daughter LOVES it, and it fits right into the little corner of her bedroom.  I'm still debating whether to hang a basket in the hole where the sewing machine was or to cover the hole completely with a thin piece of board, but for now she can do her homework in the comfort of her own room.


Adorable, right??  Now on to search for the perfect chair!

Photobucket


Click here to see the amazing sites where this and my other projects are linked!

 Other\ fun parties:
Saavy Southern Style

Tuesday, October 30, 2012

Mad Haute

Every November, when Target has their costumes at 75-90% off, I pick up a few for my kids. These have worked beautifully in the past for the Halloween Parties, Trunk or Treats, Storybook Parades at school, and countless other opportunities my kids have had to dress up prior to the actual day of Halloween.  This is not only super fun for my daughter, but preserves her "real" costume until Oct. 31.

Last year was no different.  I picked up three adorable costumes at $3 each and thought my daughter was set for this holiday.  Boy, was I wrong!!

We are in a whole new world up here in Virginia.  We weren't invited to any pre-Halloween costume parties and her school doesn't allow them to come to school in costume.  Lo and behold, her school DID decide to try Trunk or Treat last Friday night, and since she knew she wouldn't get to show off her costume to her friends, I allowed my daughter to wear her "real" costume to the event.

So let's talk about this "real" costume.  Mommy has been very busy, so I assumed my ever considerate daughter would pick one of the three costumes hanging in her closet for the last 11.5 months---and she would have---had I not shown her a picture of an adorable Queen of Hearts costume on Pinterest.  My kid is a mini-me in every way.  Her wheels started turning, and even though we went to the fabric store intending to make her the Queen of Hearts, we came out with purple, black, and green tulle, some pink and black tights and The Mad Hatter on the brain. 

What we created was Mad Haute....


I made her skirt using 9 yards of tulle, elastic and a simple tie-on method.  Click here for a tutorial. I love how it looks torn and industrial...dark and moody.  I added some tulle to a mini hat hair clip we found at Pier 1.


Next I made the floppy bow tie, tying in the colors of her tights.  I safety pinned that into a heather-gray long sleeve top to continue that industrial look.

I cut the fingers off of some simple winter gloves we've had forever, and I dug up an old vest I've had since my hipster days.  JK, I was never a hipster, but I did rock the mini vest back in 2006ish.

I tied her hair in two twisty knots, and attempted to recreate Johnny Depp's Mad Hatter make-up, to no avail.  We ended up just using lots of eyeshadow, mascara, eyeliner and lipstick to finish off the dark, Tim Burton-esque look of this costume.


I have to say, I LOVE the way it came out!!  What do you think? 

 Click here to see where this and my other posts are linked

Photobucket

Tuesday, September 18, 2012

Elephant Applique and Patchwork Throw Pillows

My friends and family are the inspiration for most of my projects, and I am so grateful to them!  It takes so much creativity just to figure out how to run a multifaceted business from home with kids on two different bus schedules, all the while having to plan dinner, do housework, worry about bills AND try to find a way to have a fulfilling life on a budget. It's no wonder my hair is falling out...seriously, it is.  I could make a wig out of what gets trapped in the shower drain!

Even so, nothing has fulfilled me creatively than creating items to share on AquaSeventy6.  So, thank you again!

The following project was inspired by some fabric I came across while mindlessly browsing the web.  It was so beautiful that I had to share it on my Facebook page.  Minutes later, my friend Natasha asked if I could use the fabric to make her some throw pillows....OF COURSE!

I ordered the fabric from a trusted shop on Etsy (small business supporting small business!) as well as some coordinating fabrics for the backside.  When the main fabric arrived, I decided to cut out the print and applique it on another fabric.....and here is what was born...


Isn't it beautiful?!

Here are both sides.  What you can't see is the zipper I added to each pillow so that my friend can toss the covers in the wash whenever she needs to.

I love this pillows so much, that I am planning to recreate them for myself...if I ever make time!  I hope you all enjoyed today's bit of eye candy! xx

 Click here to see where this and my other posts are linked


Photobucket

Tuesday, August 28, 2012

A HUGE Score and a Mustachio Apron


I know it's late!  Who blogs at 10 p.m.???  Ummm, I do!!

I spent the day doing some back-to-school shopping with the kiddos, thanks to a nice gift card my wonderful mother-in-law sent them.  Then I did one of my ALL TIME favorite things....I went thrifting! 

I didn't exactly MEAN to buy anything.  I just walked into the shop to browse and kill time, and then I saw it. The sign.  It said "All clothing $1."  Say WHAAATTTT?

I decided just to peek in the woman's section. The first thing I found was a pair of gray Liz Claiborne dress slacks, in my size.  Right next to it a pair of taupe NY & Co dress slacks (also in my size!)  I found a couple of pencil skirts, a GORGEOUS button down black midi skirt, a beautiful navy Isaac Mizrahi dress, and a Simply Vera Wang top.

I was about to walk to the register when I saw a rolling rack with some newly placed items.  I found my daughter 3 cardigans, two from Gap and one from J. Crew.  My biggest find??  A pair of LIKE NEW Banana Republic jeans in hubby's size.  Keep in mind, these are $1 each!  ONE DOLLAR!  My grand total??  $14...CHA-CHING!  That was less than what I spent on ONE long-sleeve hoodie for my son at Kohls!

I don't have any pics of my score to share with you tonight. Half of the items are in the wash, and the other half are in a bag to go to the cleaners, but I will post some as soon as I can.

I'm not going to leave you with out any pics, though.  Here is one of 6 aprons I made for my friend who's hosting a mustachio baby shower. 

Enjoy!


Click here to see where this and my other posts are linked
Photobucket

Wednesday, August 22, 2012

Back to School and Mini Wet Bags

This is the first time EVER that I have been excited about the kids going back to school.  Maybe it's because all of my Florida friends have been posting pics of their cute kids wearing cute backpacks or in their cute classrooms with their cute new teachers.  Most likely, though, it's because my soon-to-be 4th and 7th graders have perfected the art of hovering over me as I work.  In fact, these last few sentences have taken 35 minutes to write.

Being a work-at-home mom comes with many challenges, especially in the summer.  I'm constantly stopping in the middle of a project to cook a meal, referee an argument, or taking the day off altogether just to get the kids out of the house.  I understand how it feels to be bored. 


To lighten the situation, I try to sneak in a little handmade gift for my own kids whenever I can't step away from the sewing machine.  Last week I tweaked the wet bag pattern to make my daughter a reusable sandwich bag for her lunchbox.

It's lined in vinyl for easy cleanup.  My favorite thing about this bag is the zipper to help contain the crumbs!

My friend J had been looking for a zippered reusable sandwich pouch, so she ordered a couple for her little boy who started preschool this week.  She wanted something that said "back to school" but also said her little guy loves Elmo and instruments.  How do you think I did?


It made my day to get this photo from my little buddy:


If you like these mini wet bags, you can find some now in my shop! They can also be custom made!  Email me for details!


Click here to see where this and my other posts are linked

Photobucket

Monday, August 20, 2012

My Summer Hiatus (But, I'm Back!!)


Wow!  Does anyone remember me?  I can't believe it's been 6 weeks since my last blog post!  Yikes! In my defense, I did warn you earlier this summer that I would be busy making memories, and that I have.

Shortly after my Boho Headscarf post, hubby, the kids and I packed up our car and drove down to Florida to visit family and friends.  Our trip was originally scheduled to last about 10 days, but we ended up staying a little over three weeks!

If you follow my Facebook page, you will know that my nephews' infamous "twins shower", which prompted me to start designing baby gift items such as the neck tie and mustache burp cloths and the neck tie diaper and wipes pouch, finally came to fruition while I was in Florida.

I designed some super cute cupcake picks, a neck tie bunting and mini neck tie "capia" pins for the event. (Capia pins are traditional Latin American monogrammed pins that guests are given to wear at bridal and baby showers.)


After the shower, I spent a lot of time with my mom and sister.  Mom and I did some sewing:

and sis and I took our kids to the beach twice, to the movies and to lunch at the T-Rex Cafe in Downtown Disney!

Do you see my beautiful niece sporting her AquaSeventy6 flower earrings?
The rest of our trip we spent hanging out with friends and cousins.  We were strictly budgeted, (I mean, really, who can afford a 3-week vacation, even if they are staying with family?) So, our friends in  Land O Lakes, Seffner, Town N Country and St. Pete Beach took turns inviting us over for dinner.  I can't express what a beautiful gesture that was, and how much we enjoyed their company! (Thanks to R&M, D&M, J&R, A&L, J&Z, and J&C for your yummy homemade dinners, good conversation and your friendship!)

Since I've been home, I've started to work on some new items, which I will be sharing with you this week.  I also had a HUGE sale in my Etsy shop (another reason you MUST follow me on FB!) I have missed my little blog, and I hope you've missed me, too! 

Click here to see where this and my other posts are linked!

Photobucket